Spring Boot with Spring Vault & HashiCorp

Spring boot & Spring vault

To start Spring Boot with Spring Vault, we will use HashiCorp Vault.

HASHICORP vault

HashiCorp vault secures, stores and tightly controls access to tokens, passwords, certificates, API keys and other secrets.

Spring cloud vault can manage static and dynamic secrets such as username/password for remote applications/resources and provide credentials for external services such as MySQL, PostgreSQL, Apache Cassandra, MongoDB, Consul, AWS, etc.

Installation:

If you are using a Mac with homebrew, this is as simple as:

$ brew install vault

Alternatively, download Vault for your operating system from https://www.vaultproject.io/downloads.html:

$ https://releases.hashicorp.com/vault/0.8.3/vault_0.8.3_darwin_amd64.zip$ unzip vault_0.8.3_darwin_amd64.zip

For other systems with package management, such as Redhat, Ubuntu, Debian, CentOS, and Windows, see instructions at https://www.vaultproject.io/docs/install/index.html.

Start Vault:

After you install Vault, launch it in a console window. This command also starts up a server process.

$ vault server –dev –dev-root-token-id=”00000000-0000-0000-0000-000000000000″

You should see the following as one of the last output lines:

==> Vault server configuration:

 Api Address: http://127.0.0.1:8200

 Cgo: disabled

 Cluster Address: https://127.0.0.1:8201

Listener 1: tcp (addr: "127.0.0.1:8200", cluster address: "127.0.0.1:8201", max_request_duration: "999999h0m0s", max_request_size: "33554432", tls: "disabled")

 Log Level: info

 Mlock: supported: false, enabled: false

 Storage: inmem

 Version: Vault v0.10.4

 Version Sha: e21712a687889de1125e0a12a980420b1a4f72d3

WARNING! dev mode is enabled! In this mode, Vault runs entirely in-memory

and starts unsealed with a single unseal key. The root token is already

authenticated to the CLI, so you can immediately begin using Vault.

You may need to set the following environment variable:

$ export VAULT_ADDR='http://127.0.0.1:8200'

The unseal key and root token are displayed below in case you want to

seal/unseal the Vault or re-authenticate.

Unseal Key: 8rxkH8z9XgmxS4cIdtAqNHt1vgIYB99A0bITSDgGymM=

Root Token: 00000000-0000-0000-0000-000000000000

[INFO ] core: restoring leases

[INFO ] rollback: starting rollback manager

[INFO ] identity: entities restored

[INFO ] identity: groups restored

[INFO ] core: post-unseal setup complete

Insert/Update Vault Key/Values and Versioning

$ vault kv  [options] [args]

This command has subcommands for interacting with Vault’s key-value

store. The new versioned K/V mounts (and the vault kv subcommand) support writing

multiple versions. Here are some simple examples, and more detailed examples are

available in the subcommands or the documentation.

Insert:

$ vault kv put secret/my-secret my-value=demo

Key              Value

—              —–

created_time     2018-08-20T10:45:43.346121373Z

deletion_time    n/a

destroyed        false

version          1

Read:

$ vault kv get secret/my-secret

====== Metadata ======

Key              Value

—              —–

created_time     2018-08-20T10:46:16.288468021Z

deletion_time    n/a

destroyed        false

version          1

====== Data ======

Key         Value

—         —–

my-value    demo

Update (Version Update)

$ vault kv put -cas=1 secret/my-secret my-value=itsasecret

Key              Value

—              —–

created_time     2018-08-20T10:46:16.288468021Z

deletion_time    n/a

destroyed        false

version          2

NOTE: If -cas=0 the write will only be performed if the key doesn’t exist. If the index is non-zero the write will only be allowed if the key’s current version matches the version specified in the cas parameter.

There is no way to update the value of current version. If value will get updated, so will the version.

Destroy:

There are two ways to delete versioned data with vault kv: vault kv delete and vault kv destroy.

vault kv delete performs a soft deletion that marks a version as deleted and creates a deletion_time timestamp. Data removed with vault kv delete can be un-deleted by using vault kv undelete

For example, the latest version of a secret can be soft-deleted by simply running vault kv delete. A specific version can be deleted using the -versions flag.

$ vault kv delete secret/my-secret

Success! Data deleted (if it existed) at: secret/my-secret

A version soft-deleted using vault kv delete can be restored with vault kv undelete

$ vault kv undelete -versions=2 secret/my-secret

Success! Data written to: secret/undelete/my-secret

$ vault kv get secret/my-secret

====== Metadata ======

Key              Value

—              —–

created_time     2018-03-30T22:18:37.124228658Z

deletion_time    n/a

destroyed        false

version          2

====== Data ======

Key         Value

—         —–

my-value    itsasecret

However, data removed by vault kv destroy cannot be restored.

$ vault kv destroy -versions=2 secret/my-secret

Success! Data written to: secret/destroy/my-secret

Spring Boot Dependency:

$ vault kv put secret/vaultdemo demo.username=demouser demo.password=demovault demo.url=notyetset

$ vault kv put secret/vaultdemo/mysql demo.username=ankit demo.password=ankit demo.url="jdbc:mysql://localhost:3306/springboot1"

Typical POM dependencies would be:


org.springframework.cloud

spring-cloud-starter-vault-config


then configure your Vault endpoint and authentication

bootstrap.properties file:

spring.application.name= my-application

spring.cloud.vault.token=00000000-0000-0000-0000-000000000000

spring.cloud.vault.scheme=https

spring.cloud.vault.authentication=TOKEN (or AWS, anything).

boostrap.yaml file:

spring.application.name: my-application

spring.cloud.vault:

host: $HOST_NAMR (localhost or ipaddress)

port: 8200

scheme: https

token: 00000000-0000-0000-0000-000000000000

authentication: TOKEN (or AWS, anything).

DEMO:

Set 2 values in vault, one is default and other is of mysql

$ vault kv put secret/vaultdemo demo.username=demouser demo.password=demovault demo.url=notyetset

Key              Value

—              —–

created_time     2018-08-20T12:01:56.993249698Z

deletion_time    n/a

destroyed        false

version          6

$ vault kv put secret/vaultdemo/mysql demo.username=ankit demo.password=ankit demo.url="jdbc:mysql://localhost:3306/springboot1"

Key              Value

—              —–

created_time     2018-08-20T12:02:12.010325622Z

deletion_time    n/a

destroyed        false

version          4

$ vault kv get secret/vaultdemo/mysql

====== Metadata ======

Key              Value

—              —–

created_time     2018-08-20T12:02:12.010325622Z

deletion_time    n/a

destroyed        false

version          4

======== Data ========

Key              Value

—              —–

demo.password    ankit

demo.url         jdbc:mysql://localhost:3306/springboot1

demo.username    ankit

$ vault kv get secret/vaultdemo

====== Metadata ======

Key              Value

—              —–

created_time     2018-08-20T12:01:56.993249698Z

deletion_time    n/a

destroyed        false

version          6

======== Data ========

Key              Value

—              —–

demo.password    demovault

demo.url         notyetset

demo.username    demouser

Gradle Dependencies:

Add this dependency in the dependencies list:

compile('org.springframework.cloud:spring-cloud-starter-vault-config')

ext {
springCloudVersion = ‘Finchley.SR1’
}

dependencies {
compile(‘org.springframework.boot:spring-boot-starter-web’)
compile(‘org.springframework.cloud:spring-cloud-starter-vault-config’)

compile(“org.jetbrains.kotlin:kotlin-stdlib-jdk8”)
compile(“org.jetbrains.kotlin:kotlin-reflect”)
providedRuntime(‘org.springframework.boot:spring-boot-starter-tomcat’)
testCompile(‘org.springframework.boot:spring-boot-starter-test’)

compile(“org.springframework.boot:spring-boot-configuration-processor”)
}

Vault Configuration Model

Now, we will create the configuration model, as we had ran below command:

$ vault kv put secret/vaultdemo demo.username=demouser demo.password=demovault demo.url=notyetset

Here,

vaultdemo : It is name of application in bootstrap.yml

demo : it is the configuration properties

username, password & url: these are properties of configuration

Now in this command, we have set another reference:

$ vault kv put secret/vaultdemo/mysql demo.username=ankit demo.password=ankit demo.url="jdbc:mysql://localhost:3306/springboot1"

mysql: this is the active profile of application.

This way, we can set different passwords for different variables in vault and can use them as configuration property.

Below is the bootstrap.yml file and the configuration file
server:
port:
3040
spring:
application:
name:
vaultdemo
cloud:
vault:
scheme:
http
token: “12345”
host: 127.0.0.1
port: 8200
kv: # v0.10 of vault, comes with kv enabled. so this must needs to be set true
enabled: true
profiles:
active:
mysql

VaultConfiguration.kt

// $ vault kv put secret/vaultdemo demo.username=demouser demo.password=demovault demo.url=notyetset
// ConfigurationProperties = demo
// as demo.username, demo.password, demo.url
//
@ConfigurationProperties(“demo”)
class VaultConfiguration(
var username:String=””,
var password:String=””,
var url:String=””
)

The source code is available here for demo.
nginx server installation on Mac OSX-Lion in 5 minutes

Hi all,

Today, I am sharing few steps

1. Install Homebrew on mac (if not available):
$ ruby -e "$(curl -fsSL https://raw.github.com/mxcl/homebrew/go)"

2. Homebrew homebrew:
$ brew update

3. Install nginx server using brew command.
$ brew install nginx

4. Test nginx installation.
#start nginx
$ sudo nginx
# verify server
$ curl localhost:8080
#close nginx
$ sudo nginx -s stop

Configuration Settings:

1. create some root folder for nginx html files.
$ mkdir {HOME}/nginx
$ cd {HOME}/nginx

2. create  root folder in nginx html files.
$ mkdir root
$ cd root
$ pwd

3. open conf file from nginx build folder
$ sudo mate /usr/local/etc/nginx/nginx.conf

4. The file contains:

#gzip on;

server {
listen 80;
server_name localhost;

#charset koi8-r;

#access_log logs/host.access.log main;

location / {
root html;
index index.html index.htm;
}

3. In above, change “listen 8080” to “listen 80”.

4. Then change root path from “html” to the path created above in step 2. i.e. “{HOME}/nginx/root”

#gzip on;

server {
listen 80;
server_name localhost;

#charset koi8-r;

#access_log logs/host.access.log main;

location / {
root /Users/${username}/Workspace/nginx/root;
index index.html index.htm;
}

5. Now again start and stop nginx server.
#start nginx
$ sudo nginx
# verify server

$ curl http://127.0.0.1:80

<html>
<head><title>403 Forbidden</title></head>
<body bgcolor=”white”>
<center><h1>403 Forbidden</h1></center>
<hr><center>nginx/1.4.1</center>
</body>
</html>

#close nginx
$ sudo nginx -s stop

Now nginix server is serving pages from your custom root folder

Installation Cappuccino and Objective-J on Mac OS Lion

Hi team,

Firstly download Cappuccino framework Starter and unzip the file.

After that, open Terminal and reach till the Starter folder.

After this, just run boostrap script file.

./bootstrap.sh

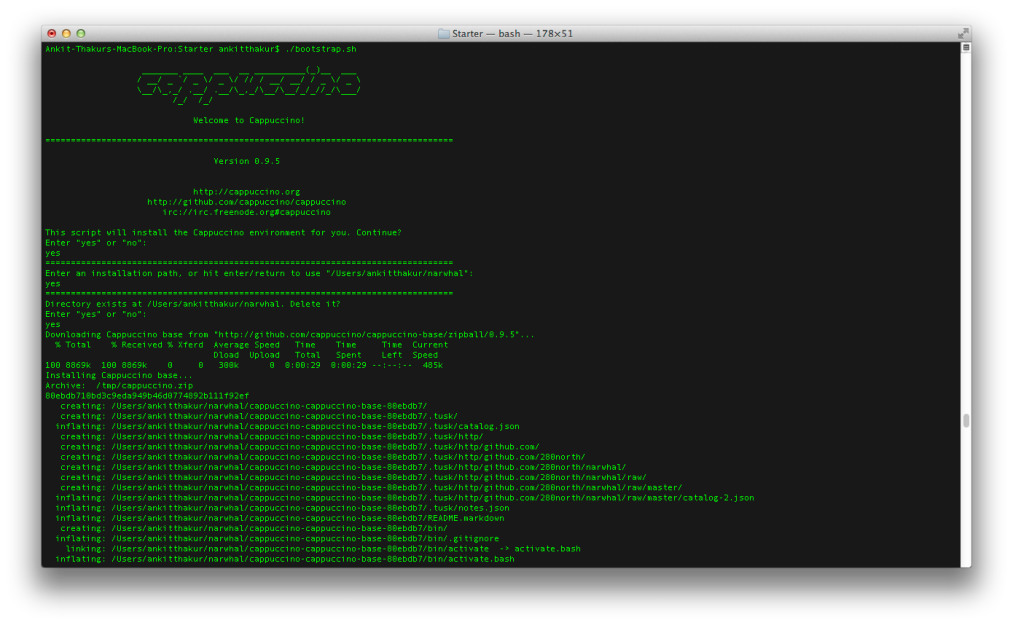
Then it will start logging like:

Image

During this process, It will ask few queries

This script will install the Cappuccino environment for you. Continue?
Enter “yes” or “no”:
yes

….

Would you like to build the JavaScriptCore engine? This is optional but will 
make building and running Cappuccino and Objective-J much faster.
Enter “yes” or “no”: 
yes

….

Rhino is the default engine. Should we change the default to JavaScriptCore for 
you? This can by overridden by setting the NARWHAL_ENGINE environment variable 
to “jsc” or “rhino”.
“export NARWHAL_ENGINE=jsc” will be appended to “”.
Enter “yes” or “no”: 
yes

…..

You must add Cappuccino’s “bin” directory to your PATH environment variable. 
Do this automatically now?
“export PATH=”/Users/ankitthakur/narwhal/bin:$PATH”” will be appended to “”.
Enter “yes” or “no”: 
yes

….

Before building Cappuccino we recommend you set the $CAPP_BUILD environment 
variable to a path where you wish to build Cappuccino. This can be automatically
set to the default value of “/Users/ankitthakur/Documents/docs/Capuccino_framework/Starter/Build”, or you can set $CAPP_BUILD yourself.
“export CAPP_BUILD=”/Users/ankitthakur/Documents/docs/Capuccino_framework/Starter/Build”” will be appended to “”.
Enter “yes” or “no”: 
yes

….

After successful installation,

export bin directory in $PATH

as PATH=$PATH:/Cappuccino installation path/narwhal/bin

after this, just type

capp -help

It should log:

capp [--version] COMMAND [OPTIONS] [ARGS]
  --version Print version
  -h, --help Print this help
gen [OPTIONS] PATH Generate a new project at PATH from a predefined template
  -l Same as --symlink --build, symlinks $CAPP_BUILD Frameworks into your project
  -t, --template NAME Specify the template name to use (see `capp gen --list-templates`)
  -f, --frameworks Copy/symlink *only* the Frameworks directory to a new or existing project
  -F, --framework NAME Additional framework to copy/symlink (default: Objective-J, Foundation, AppKit)
  --force Overwrite Frameworks directory if it already exists
  --symlink Symlink the source Frameworks directory to the project, don't copy
  --build Copy/symlink the Frameworks directory files from your $CAPP_BUILD directory
  --noconfig Use the default configuration when replacing template variables
Without -l or --build, frameworks from your narwhal installation are copied/symlinked
gen --list-templates List the template names available for use with `capp gen -t/--template`
  gen --list-frameworks List the framework names available for use with `capp gen -F/--framework`
config ...
  KEY VALUE Set a value for a given key
  -l, --list List all variables set in config file.
  --get KEY Get the value for a given key
  --remove KEY Remove the value for a given key

It means Cappuccino is successfully installed on your system.

Objective-C Literals 2

Similar to Array and Dictionary as per my last post, we can use NSNumbers:

NSNumber Literals

Previously:

NSNumber *number;

number = [NSNumber numberWithChar:’X’];

number = [NSNumber numberWithInt:12345];

number = [NSNumber numberWithUnsignedLong:12345ul];

number = [NSNumber numberWithLongLong:12345ll];

number = [NSNumber numberWithFloat:123.45f];

number = [NSNumber numberWithDouble:123.45];

number = [NSNumber numberWithBool:YES];

Now:

NSNumber *number;

number = @’X’;

number = @12345;

number = @12345ul;

number = @12345ll;

number = @123.45f;

number = @123.45;

number = @YES;

Objective-C Literals -1

Hi all,

In iOS SDK 6 beta 4 with XCode 4.5, Apple has introduced Clang LLVM Compiler based Objective-C literals. It is introduced in Clang LLVM Compiler 4.

I have tried to use literals in NSDictionary with array of keys and values.

NSDictionary *dict1 = [NSDictionary dictionaryWithObjects:@[@”value 1″, @”value 2″] forKeys:@[@”key1″, @”key2″]];

NSDictionary *dict2 = @{@”key 3″:@”value 3″, @”key 4″ : @”value 4″};

NSLog(@”%@”, dict1);

NSLog(@”%@”, dict2);

And here is the output

2012-08-07 13:32:20.838 ObjCLiterals1[46236:11303] {

    key1 = “value 1”;

    key2 = “value 2”;

}

2012-08-07 13:32:20.841 ObjCLiterals1[46236:11303] {

    “key 3” = “value 3”;

    “key 4” = “value 4”;

}

In above code, I have used 2 literals

a) Literals for Array

NSArray *array = [NSArray arrayWithObjects:obj1, obj2, obj3, nil];

with

NSArray *array = @[obj1, obj2, obj3] // @[@”value 1″, @”value 2″]

2) Literals for Dictionary

NSDictionary *dict1 = [NSDictionary dictionaryWithObjects:@[@”value 1″, @”value 2″] forKeys:@[@”key1″, @”key2″]];

NSDictionary *dict2 = @{@”key1″:@”value 1″, @”key 2″ : @”value 2″};

MySQL Integration with SpringSource ToolSuite

In my last post, I have shown the installation of MySQL on Mac OSX.

Now in this post, I am going integrate Mysql with SpringSource Tool Suite.

1. In STS, we will open Window>Perspective>Database Debug

Then, we will select Database Connections in Data Source Explorer window and right click on the same and select New.

Image

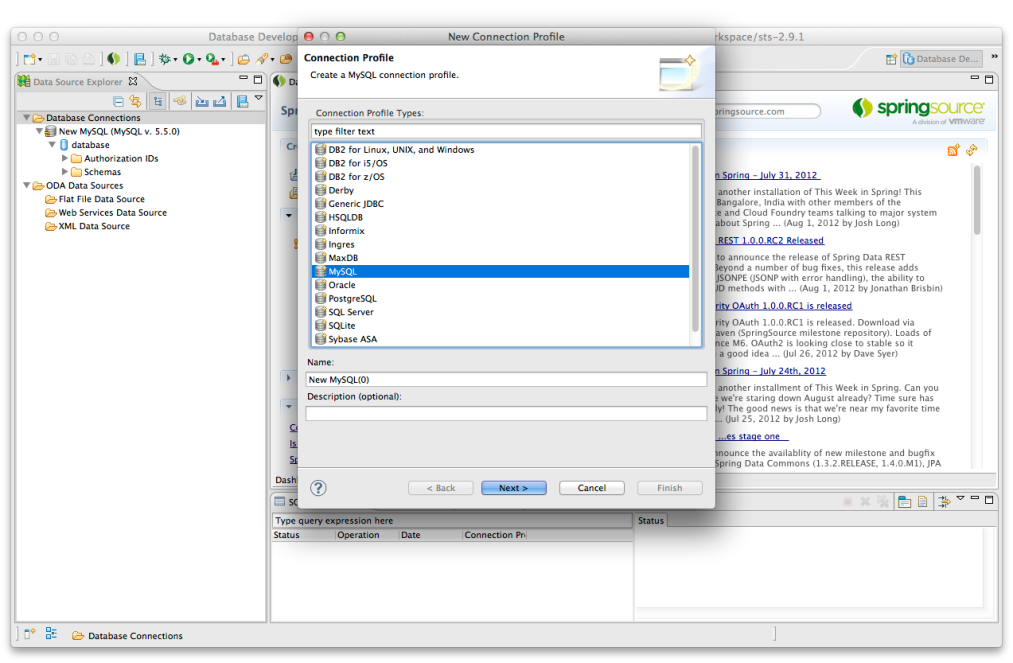
Now select MySQL from Connection Profile list and click Next

Image

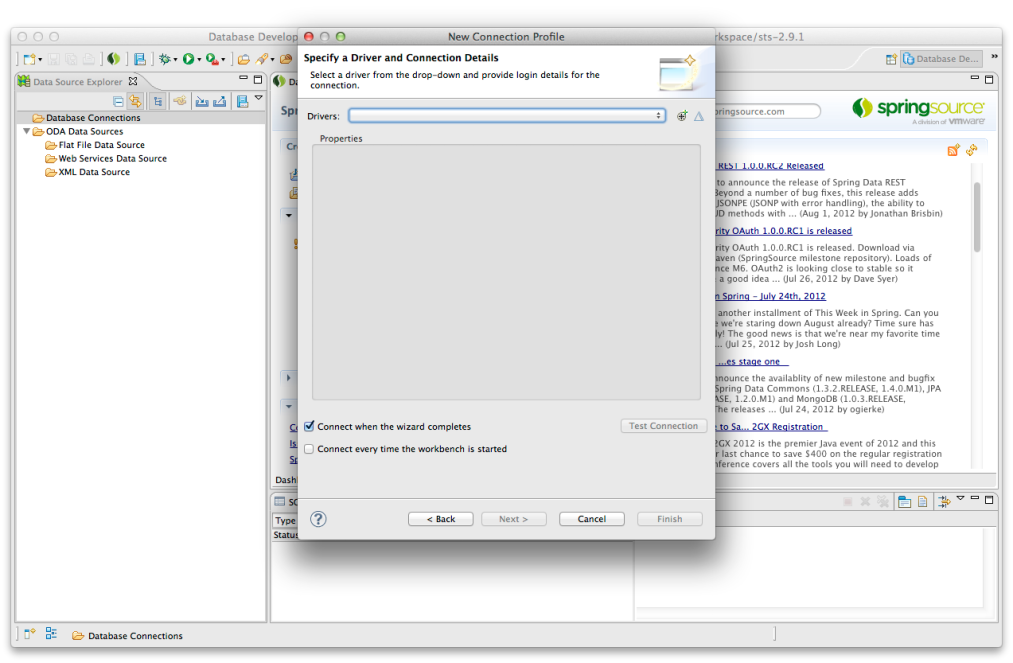
Now Select New Connection on right icon of Drivers and select MySQL 5.1 or anyone as per your requirement:

Image

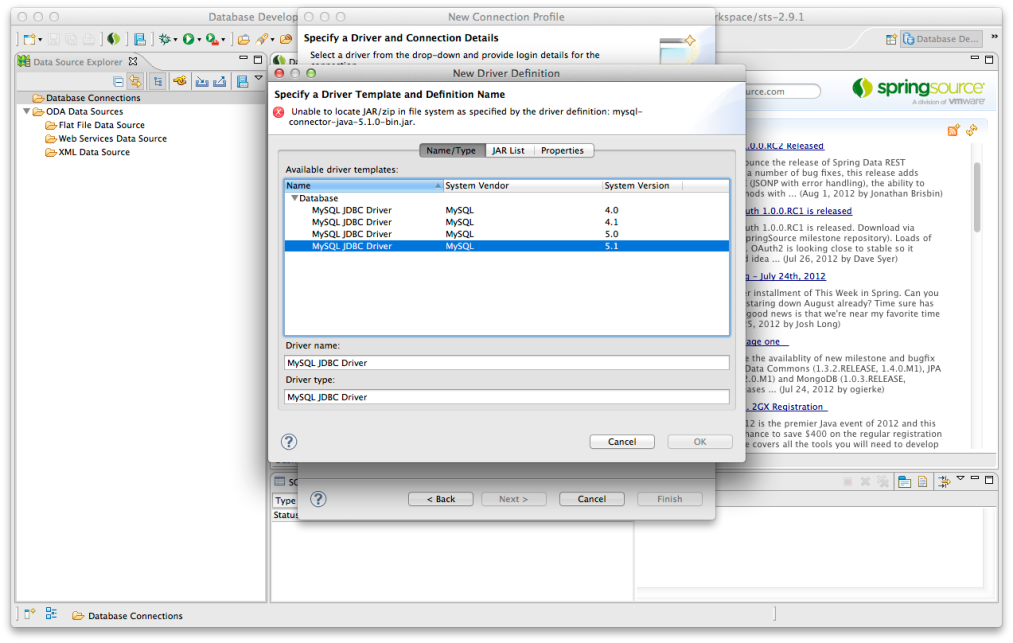
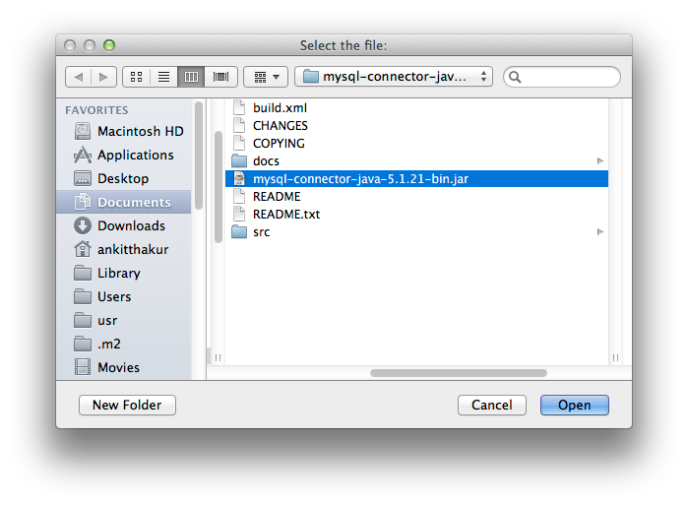
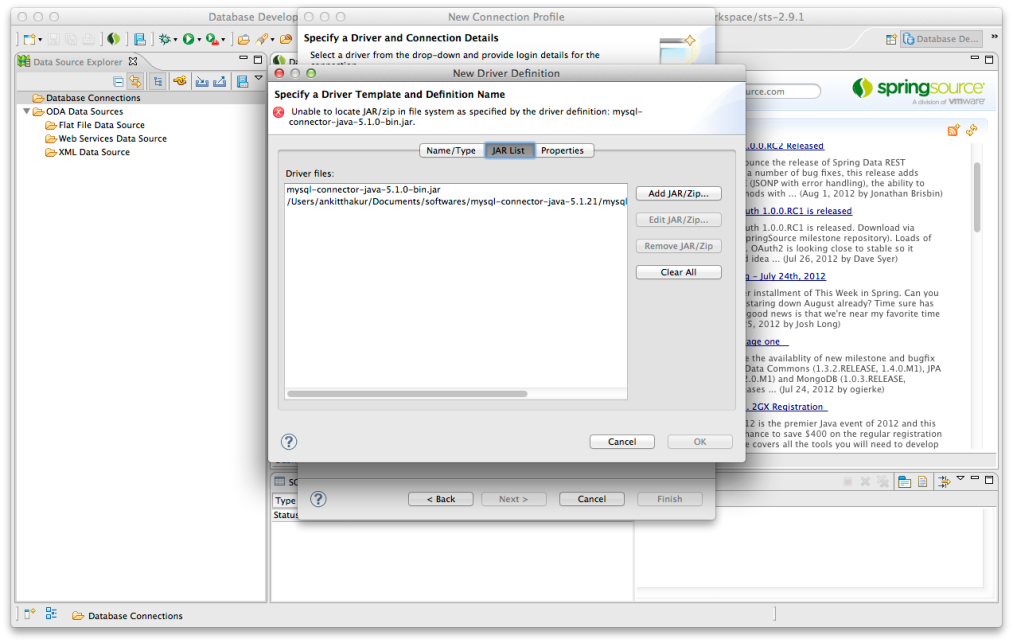
Since STS cannot find mysql-connector-java-5.1.0-bin.jar, so it is showing the error. Now select jar list and add mysql-connector-java-5.1.21-bin.jar as below

Image

Image

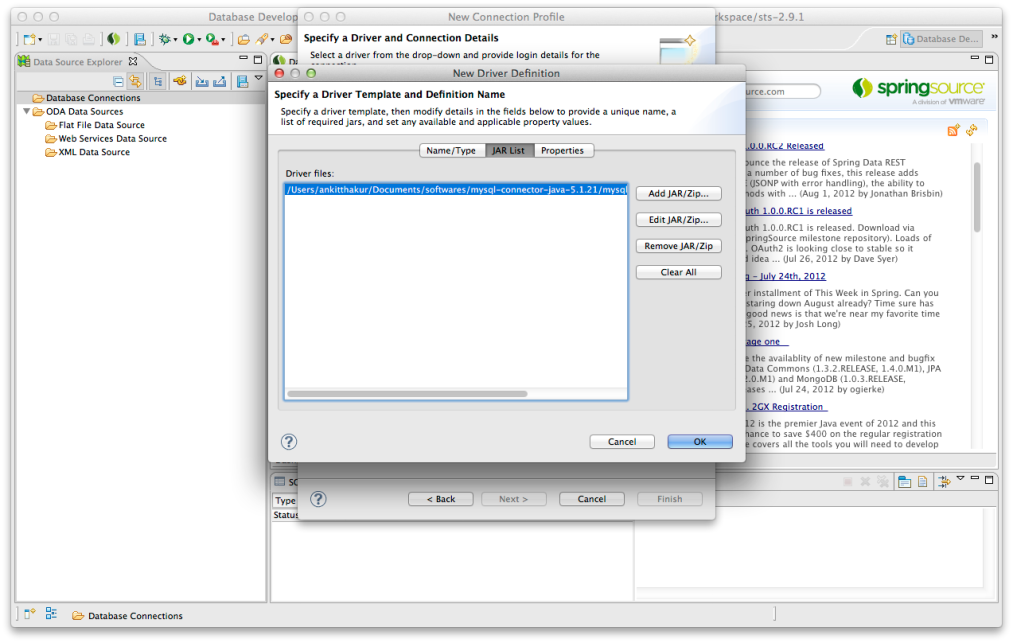
Now delete mysql-connector-java-5.1.0-bin.jar,  and the error will get removed.

Image

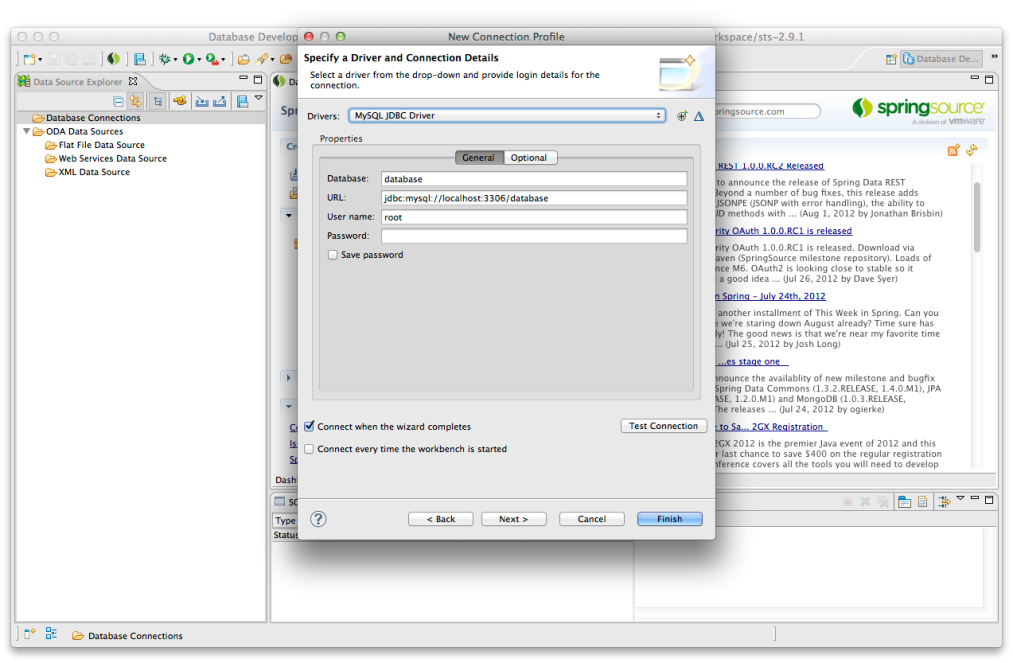
Now Driver is added, and we will check the connection. In following screen, there is a URL field. If the database is existing with name

jdbc:mysql://localhost:3306/database

then it is fine. Else delete remove database from url path.

Image

Now in Password field, enter the password for “root@localhost” account. For verification, please refer my last post.

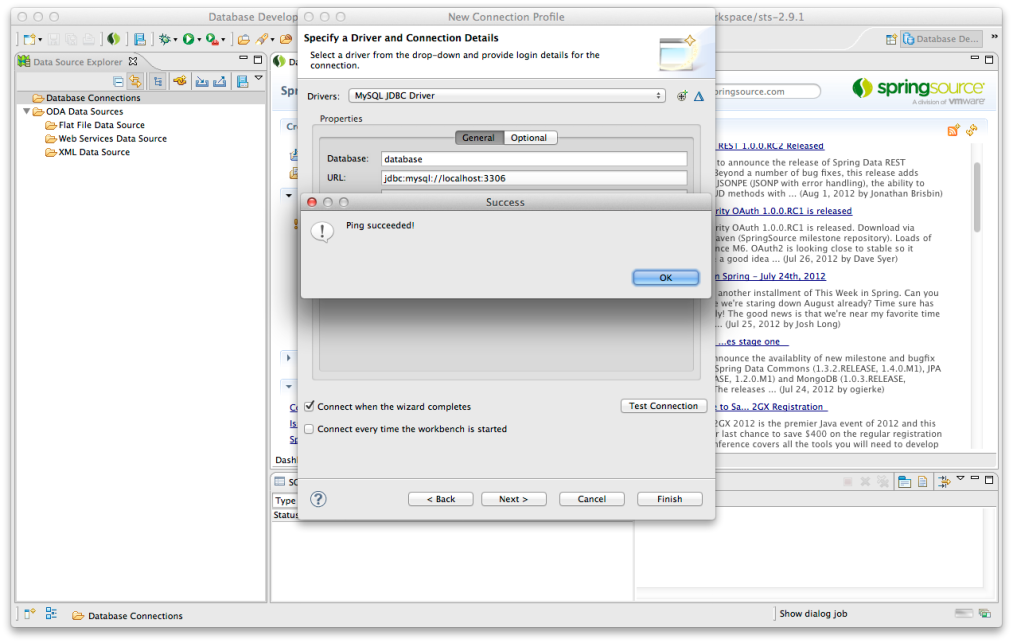
After entering password, select Test Connection and on success, you will see following screen

Image

MySQL Install and Uninstall on MacOSX Lion

INSTALL MYSQL

Download MySQL from a local mirror. You want the Mac OS X ver. 10.7 (x86, 64-bit), DMG Archive.

You can use the package installer with Mac OS X 10.7 from above link.

After installation, use following script:

Initially there will be no password, so when we will run following command, then just enter on “Enter Password”
$ /usr/local/mysql-5.5.25a-osx10.6-x86_64/bin/mysql -u root -p
Enter password:

Welcome to the MySQL monitor. Commands end with ; or \g.
Your MySQL connection id is 1
Server version: 5.5.25a MySQL Community Server (GPL)

Copyright (c) 2000, 2011, Oracle and/or its affiliates. All rights reserved.

Oracle is a registered trademark of Oracle Corporation and/or its
affiliates. Other names may be trademarks of their respective
owners.

Type ‘help;’ or ‘\h’ for help. Type ‘\c’ to clear the current input statement.

mysql>

Securing the Initial MySQL Accounts

To display which accounts exist in the mysql.user table and check whether their passwords are empty, use the following statement:

mysql> SELECT User, Host, Password FROM mysql.user;
+——+———————————+———-+
| User | Host | Password |
+——+———————————+———-+
| root | localhost | |
| root | Ankit-Thakurs-MacBook-Pro.local | |
| root | 127.0.0.1 | |
| root | ::1 | |
| | localhost | |
| | Ankit-Thakurs-MacBook-Pro.local | |
+——+———————————+———-+
6 rows in set (0.00 sec)

This output indicates that there are several root and anonymous-user accounts, none of which have passwords. The output might differ on your system, but the presence of accounts with empty passwords means that your MySQL installation is unprotected until you do something about it:

  • You should assign a password to each MySQL root account.

mysql> SET PASSWORD FOR ‘root’@’localhost’ = PASSWORD(‘new_password‘);
Query OK, 0 rows affected (0.00 sec)

mysql> SELECT User, Host, Password FROM mysql.user;
+——+———————————+——————————————-+
| User | Host | Password |
+——+———————————+——————————————-+
| root | localhost | *BA4CC4BC565BFE76A3CB5215D5E6AA5FAB3FCEF1 |
| root | Ankit-Thakurs-MacBook-Pro.local | |
| root | 127.0.0.1 | |
| root | ::1 | |
| | localhost | |
| | Ankit-Thakurs-MacBook-Pro.local | |
+——+———————————+——————————————-+
6 rows in set (0.00 sec)

mysql> SET PASSWORD FOR ‘root’@’127.0.0.1’ = PASSWORD(‘new_password‘);
Query OK, 0 rows affected (0.00 sec)

mysql> SELECT User, Host, Password FROM mysql.user;
+——+———————————+——————————————-+
| User | Host | Password |
+——+———————————+——————————————-+
| root | localhost | *BA4CC4BC565BFE76A3CB5215D5E6AA5FAB3FCEF1 |
| root | Ankit-Thakurs-MacBook-Pro.local | |
| root | 127.0.0.1 | *A39A54504ADCD2AB81A3AC8E6C6C2D5BE92454FB |
| root | ::1 | |
| | localhost | |
| | Ankit-Thakurs-MacBook-Pro.local | |
+——+———————————+——————————————-+
6 rows in set (0.00 sec)

mysql> SET PASSWORD FOR ‘root’@’::1′ = PASSWORD(‘new_password‘);
Query OK, 0 rows affected (0.00 sec)

mysql> SELECT User, Host, Password FROM mysql.user;
+——+———————————+——————————————-+
| User | Host | Password |
+——+———————————+——————————————-+
| root | localhost | *BA4CC4BC565BFE76A3CB5215D5E6AA5FAB3FCEF1 |
| root | Ankit-Thakurs-MacBook-Pro.local | |
| root | 127.0.0.1 | *A39A54504ADCD2AB81A3AC8E6C6C2D5BE92454FB |
| root | ::1 | *48EF8CC3485A3DC12CE985A635253F255FE8A150 |
| | localhost | |
| | Ankit-Thakurs-MacBook-Pro.local | |
+——+———————————+——————————————-+
6 rows in set (0.00 sec)

mysql> SET PASSWORD FOR ‘root’@’Ankit-Thakurs-MacBook-Pro.local’ = PASSWORD(‘new_password‘);
Query OK, 0 rows affected (0.00 sec)

mysql> SELECT User, Host, Password FROM mysql.user;
+——+———————————+——————————————-+
| User | Host | Password |
+——+———————————+——————————————-+
| root | localhost | *BA4CC4BC565BFE76A3CB5215D5E6AA5FAB3FCEF1 |
| root | Ankit-Thakurs-MacBook-Pro.local | *62C39A3C269FEA9CFBDF0480A9D2978FE638926B |
| root | 127.0.0.1 | *A39A54504ADCD2AB81A3AC8E6C6C2D5BE92454FB |
| root | ::1 | *48EF8CC3485A3DC12CE985A635253F255FE8A150 |
| | localhost | |
| | Ankit-Thakurs-MacBook-Pro.local | |
+——+———————————+——————————————-+
6 rows in set (0.00 sec)

mysql> exit
Bye

$ ankitthakur$ export PATH=$PATH:/usr/local/mysql-5.5.25a-osx10.6-x86_64/bin

$ ankitthakur$ mysql -u root -p
Enter password:

Welcome to the MySQL monitor. Commands end with ; or \g.
Your MySQL connection id is 2
Server version: 5.5.25a MySQL Community Server (GPL)

Copyright (c) 2000, 2011, Oracle and/or its affiliates. All rights reserved.

Oracle is a registered trademark of Oracle Corporation and/or its
affiliates. Other names may be trademarks of their respective
owners.

Type ‘help;’ or ‘\h’ for help. Type ‘\c’ to clear the current input statement.

mysql> exit

Jenkins-CI Configuration for iOS Development with XCode

1.    Prerequisites:

  • XCode must be installed on the machine.
  • Install Command Line tool, if already not installed using XCode > Preferences > Downloads > Command Line Tool
  • Set path of  “xcodebuild” command . To set path use following steps:
    • Open terminal and run below command to verify if path indicated is “/Applications/XCode/Contents/Developer”

xcode-select -print-path

  • If path is not correct then run below command to set path

sudo xcode-select -switch /Applications/Xcode.app/Contents/Developer

2.    Jenkins-CI Installation Steps:

1) Download Jenkins/Hudson from

http://mirrors.jenkins-ci.org/osx/latest

and following following steps:

  • Install Jenkins

  • After installation, following screen will appear:

Now jenkins will get start and it will launch in browser at

***   http://localhost:8080 ****

then select “ENABLE_AUTO_REFRESH” link on top left corner of jenkins’s page.

3.    Jenkins-CI Home Path Steps:

  • Create user account with name “jenkins” and password “iosDev” with admin rights from Login Account

System Preferences / Account

  • Now change home path of  “jenkins” user

sudo dscl . create /Users/jenkins home /Users/Shared/Jenkins/Home/

  • Stop jenkins-ci so that we can change jenkins-ci configuration

sudo launchctl unload /Library/LaunchDaemons/org.jenkins-ci.plist

  • Now allow jenins-ci config file editing permission change ${useraccount} with root user account

sudo chown -R ${useraccount}: /Library/LaunchDaemons/org.jenkins-ci.plist

  • Edit org.jenkins-ci.plist file to set the username to jenkins instead of daemon

#       <?xml version=”1.0″ encoding=”UTF-8″?>

#       <!DOCTYPE plist PUBLIC “-//Apple//DTD PLIST 1.0//EN” “http://www.apple.com/DTDs/PropertyList-1.0.dtd”&gt;

#       <plist version=”1.0″>

#                <dict>

#                         <key>Label</key>

#                         <string>org.jenkins-ci</string>

#                         <key>UserName</key>

#                         <string>jenkins</string>

#                         <key>GroupName</key>

#                         <string>daemon</string>

#                         <key>ProgramArguments</key>

#                         <array>

#                                   <string>/usr/bin/java</string>

#                                   <string>-Xmx512m</string>

#                                   <string>-jar</string>

#                         <string>/Applications/Jenkins/jenkins.war</string>

#                         </array>

#                         <key>RunAtLoad</key>

#                         <true/>

#                         <key>KeepAlive</key>

#                         <true/>

#                         <key>EnvironmentVariables</key>

#                         <dict>

#                                   <key>JENKINS_HOME</key>

#                                   <string>/Users/Shared/Jenkins/Home</string>

#                         </dict>

#                </dict>

#       </plist>

  • sets the permissions how they need to be

sudo chown -R jenkins: /Users/Shared/Jenkins/Home

  • now change LaunchDaemons settings back to root

sudo chown -R root: /Library/LaunchDaemons/org.jenkins-ci.plist

  • restart the jenkins-ci

sudo launchctl load /Library/LaunchDaemons/org.jenkins-ci.plist

4.    Jenkins-CI Keychain Access Steps:

Login as user ‘jenkins’ and enter the following in the terminal.

  • create new keychain account with “ios_dev” name for jenkins user with password “ios_dev”

security create-keychain -p ios_dev ios_dev

  • set ios_dev as default one

security default-keychain ios_dev

  • import PKCS (Certificates.p12) certificate in “ios_dev”, where Certificates.p12 password is ios_dev

security import /Users/Jenkins/Home/prerequisites/Certificates.p12 -k ios_dev -f pkcs12 -A -P ios_dev

5.    XCodebuild command License acceptance:

But, we were still not able to execute xcodebuild script, which is shown in above screen. And to verify the same, I have executed the same script in terminal.

$ sudo xcodebuild –license

To accept this certificate, just enter space, and once it will reach to the end, it will ask for agree, print or cancel. Just type agree

Build Scripts for Berkeley DB static libraries with iOS Development

Hi all,

As per the latest Berkeley DB released by Oracle came with the compatibility with iOS development.

Firstly download the Berkeley DB from Oracle website

Berkeley DB 5.1.19.tar.gz

Then unzip the tar file.

use cd command to reach till db-5.1.19/build_unix folder

and use following commands for configuring the build.

Here are build scripts which I used to create static library for iOS 4 development.

1) Use this for iPhone Simulator

export DEV_iSimulator=/Developer/Platforms/iPhoneSimulator.platform/Developer
export SDK_iSimulator=${DEV_iSimulator}/SDKs/iPhoneSimulator4.2.sdk
export COMPILER_iSimulator=${DEV_iSimulator}/usr/bin
export CC=${COMPILER_iSimulator}/gcc
export CXX=${COMPILER_iSimulator}/g++
export LDFLAGS=”-arch i386 -pipe -Os -gdwarf-2 -no-cpp-precomp -mthumb -isysroot ${SDK_iSimulator}”
export CFLAGS=${LDFLAGS}
export CXXFLAGS=${LDFLAGS}
export CPP=”/usr/bin/cpp ${CPPFLAGS}”
export LD=${COMPILER_iSimulator}/ld
export AR=${COMPILER_iSimulator}/ar
export AS=${COMPILER_iSimulator}/as
export NM=${COMPILER_iSimulator}/nm
export RANLIB=${COMPILER_iSimulator}/ranlib

../dist/configure –host=i386-apple-darwin10

Now use following commands for creating the static libraries

make

make install

Now you will find libdb-5.1.a static library. Now creates build_i386 folder and copy libdb-5.1.a library in build_i386 folder.

Now clean the build script with

make clean

And for clearing the configuration run script

make realclean

then for creating the iOS library use following script.

2) For iOS Development

export DEV_iOS=/Developer/Platforms/iPhoneOS.platform/Developer
export SDK_iOS=${DEV_iOS}/SDKs/iPhoneOS4.2.sdk
export COMPILER_iOS=${DEV_iOS}/usr/bin
export CC=${COMPILER_iOS}/gcc
export CXX=${COMPILER_iOS}/g++
export LDFLAGS=”-arch armv6 -pipe -Os -gdwarf-2 -no-cpp-precomp -mthumb -isysroot ${SDK_iOS}”
export CFLAGS=${LDFLAGS}
export CXXFLAGS=${LDFLAGS}
export CPP=”/usr/bin/cpp ${CPPFLAGS}”
export LD=${COMPILER_iOS}/ld
export AR=${COMPILER_iOS}/ar
export AS=${COMPILER_iOS}/as
export NM=${COMPILER_iOS}/nm
export RANLIB=${COMPILER_iOS}/ranlib

../dist/configure –host=arm-apple-darwin10

again use 2 same commands as above

make

make clean

then create a universal library with integrating i386 based libdb-5.1.a and armv6 arch based libdb-5.1.a library using lipo command

lipo -create /Users/ankitthakur/Documents/berkely-db/build_i386/libdb-5.1.a /Users/ankitthakur/Documents/berkely-db/build_ios4/libdb-5.1.a -output libdb-5.1.a

Thanks